Tuesday, April 24, 2012

If Chicken and Waffles Could Extract Bolts...

The wrenching Monday began with a delicious Chicken and Waffles meal.

The first casualty of the night was our friend Mr. Beetle.  He went for a swim in the cup of WD-40 RIP


Moving right along...I rebuilt the front forks and filled them with ATF fluid.  What a difference with the new seals and fresh oil!

Next Matt removed the transmission and crank to clean out the sludge at the bottom of the engine.


Matt noticed this on our top half of the case: SL250...hmmm

Say...that kick start gear is missing a tooth!

 The next item of discontent was this sheared engine bolt.  The bolt is steel and the case aluminum.  They've become quite attached over the past 35 years.
 After exhausting all options with the vice grips, Matt resorted to heat to try and get it out.  This is an oxygen bubble and the torch did not look like that all the time folks ;)

So some heat, a hammer, vice grips and...nothing - just a rounded bolt.  Bugger all.

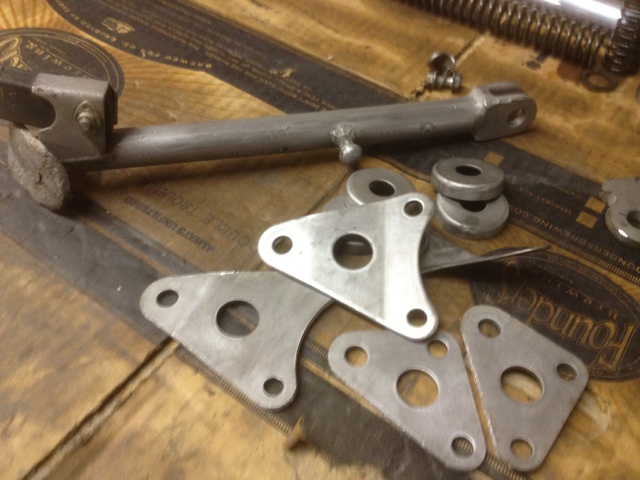
Stymied in that direction, it was time to work on rebuilding the triple tree.  Despite bearings rolling all over the garage upon disassembly all 36 (18 1/4" bearings on each side) were accounted for.


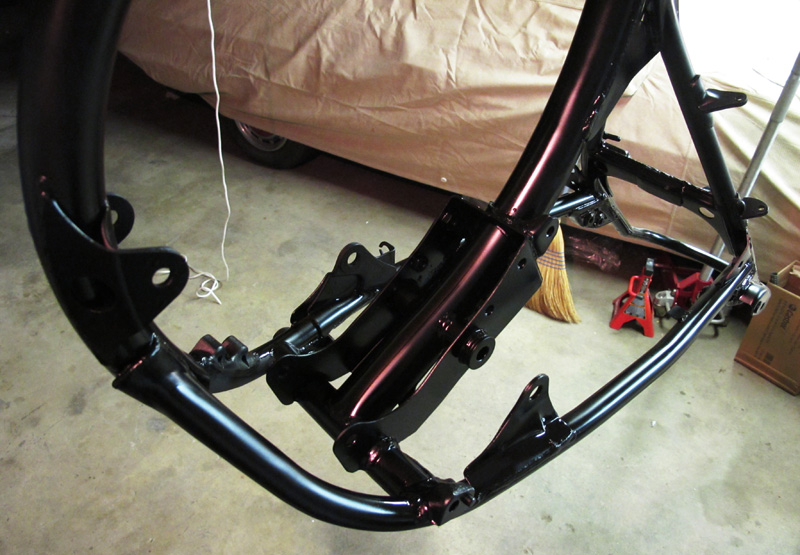
TADA!!!  The first bit bolted onto the frame :)

We also rebuilt the rear shocks after having painted the springs.  This was in preparation for the swingarm installation.  A rolling chassis is on the horizon!!!


Friday, April 20, 2012

A weld too short is more like it...

It was a late night in the garage.  Got the final coat on the frame around 2am.

First, Gratuitous Welding shots:


 The "weld too short" was the kickstand mount that we decided not to just guess on.  To get the angle/placement right we need it to be a roller.  I guess we'll be leaning it on parking meters/trees for the time being...


Frame finally painted.  Now the problem of finding the patience to let it cure for a week before we start bolting things to it...


Tail looks great.  Many thanks to Denis!


Rolling chassis, here we come...

Thursday, April 19, 2012

A Weld Too Far

Leaving work an hour early was nice.

I rode the BMW down the HOV to Newington where my friend Denis works.  His shop had every tool and equipment item for fabrication I could think of.


First step was to cut off the old frame support.


The next step was to bend the existing hoop to give it a bit of an angle.  Unfortunately this resulted in closing the ends up and not really bending anything.


Next, we bent some smaller diameter bar to support the thin and hollow loop into the frame.  We mocked up the hoop then went and bent the bar to match the necessary angle.

A few tack welds to hold it in place

Then the MIG welding!

(insert video)


After letting it cool a bit, we thanked him profusely and headed back to the garage to get some work done!  I took a stop at Lowes to pick up 50lb of play sand.  When I pulled in, I couldn't resist parking in front of this bumblebee airhead GS


So 50lb extra on one side of a motorcycle is VERY STRANGE

Once unloaded at the garage, he made burgers and I set up the equipment for sandblasting in the yard.

A man can't live on beer alone...for long...so - Burgers :)

I then blasted the engine mounts, kickstand and fenders.


Meanwhile, Matt ground off the existing tabs and smoothed out some of the welds and loose metal pieces.


The frame was sanded again and acetone cleaned.

A little bondo filled in the cracks and small imperfections in the weld area.  He did such a great job welding the issues were mostly our own doing!

We also picked up a piece of foam to later mock up a seat design.  VERY stoked about that.


I was tired and ready to head home.  Matt was drinking and on a ladder preparing the ceiling for wires to hang parts for painting.  With 2-3 hours of drying time required before the bondo sets, it could be a late night getting primer and paint done.   Go Matt Go!!

Mostly Successful

The evening wrenching went well, until we looked at the list around 11:00 and saw all the stuff we forgot to do.  Oh well.

  1. Matt sanded the fins on the lower part of the top end.  
  2. The kick stand support was ground down and the frame stuffed in the trunk of the TDI for welding tomorrow.
  3. We disassembled the other fork and replaced the oil seal. 
  4. I cleaned the fork lowers and prepped for paint.  We settled on painting only the top half of the bottom end of the engine in aluminum colored paint.  
  5. Here Matt is putting on the primer coat ahead of paint.

6.  The fingerprints on the tank in the clear coat were getting to Matt so he decided to clean it again with acetone and respray it.

    Wednesday, April 18, 2012

    What is left?

    So we are nearing the build timeframe for the bike.  SUPER STOKED!

    Tonight we plan to:
    1. Rebuild the other front fork and clean/sand both.
      1. Fill with ATF Oil
    2. Lightly sand fins if finishing coat is dry enough
    3. Kick stand ideas/clean up old mount (for welding Thursday)
    4. Mount rear sprocket
    5. Mount brake drums to wheels
    6. Begin engine assembly (if paint is dry enough)
    Thursday Welding
    1. Frame hoop 
    2. Kick stand bracket
     On one sunny day:
    1. Get Sand/Sandblast box of parts (engine mounts, kick stand etc..)
    2. Paint blasted parts (sit for 7 days)
    3. Paint Frame (sit for 7 days)

    Once the paint is dry...WE BUILD! and curse

     Things we still need:
    1. Sanity
    2. Long hours in the garage
    3. Beer
    4. More Beer
    Parts we still need:
    1. Handlebar Tape Wrap
    2. Exhaust Fabrication/Maybe Exhaust Wrap
    3. Speedometer
    4. Headlight
    5. Metal Fenders?
    6. Seat Pan/Foam

    Tuesday, April 17, 2012

    Lauren's Garage Pics

    The talented Lauren and her talented phone.

    Monday Monday...

    So as if the weekend's festivities were not enough, Monday night saw us back out in the garage fixing all the problems we made with too much beer and wrench swinging.

    Lauren and Matt removing the popped tube.  I replaced it with a new one from the motorcycle shop.  I have a feeling it is also flat in the garage as I write this but I'm going to try and be positive about it!

    Lauren was very busy sanding the spokes and cleaning up the rims.  Thanks!
     

    Meanwhile Matt was just doing this...come on man get to work!
    I cleaned up the work bench (woohoo fresh cardboard!) and went about sorting all the spare parts into those we are using, to be sandblasted, painting or scrap/extra. 

    Usable and finished parts on our Ruckus-shelf

     To be Painted:

    All cleaned up with the help of Lauren and my trusty Dremmel tool.

     Matt sanded down the edges of the fins then gave them another coat of paint to clean up the small cracks.
     
    Having never rebuilt a set of forks, I grabbed the manual (which seems to cover every Honda built between 1969 and 1980) and got down to business.  This production brought to you by the delicious Deviant Dales.
     After removing the circlip, Matt summoned his superhuman strength to hulk the ancient oil seal from the fork tube.  This action shot happens to shop him right as it popped out and went flying into a dark recess of the garage.

     Lauren decided to take a nap around midnight.  Matt decided to wake her up by pushing the convertible down the driveway with her in it!  What are friends for?