Wednesday, May 16, 2012

Engine Built & Hung

Tonight saw the engine FINALLY built & finished and then hung in the bike.  It feels like real progress, but the work still remaining is quite daunting.  Ahead lies detail, finesse, and design.  And not just torque specs and assembly order...


"In" indeed:


Mike tries the fit w/ an engine in the frame:


I think Mikey likes it!


SUCH a weird carb.  But freakin' beautiful:

Wednesday, May 9, 2012

Minor Progress (very minor)

We finally started getting the engine together.  Unfortunately we seem to have misplaced one cir-clip for the piston wrist-pin (you're excused if you have no idea what that means...).  So this is as far as we got:


Then some slight mocking up of the seat.  Whilst watching some hockey.


And that's about all.  What?  I told you it was minor...

Friday, May 4, 2012

Rolling Frame + Design Questions

Mocking up a seat pan and fenders.  Got some changes to make to all...


Mike mocks in the headlight.  Will it work???


Thursday, May 3, 2012

Tire Swaparoo

This marks the third time we have removed and refitted the front wheel on the rim.  The first problem was a tube leak, patched it and replaced.  Next was replacing that tube.  Finally we put the damn tire on the wrong way (against rotation), so Wednesday night I took the tire and tube out and reversed them.  This put a few scratches on the rim but blemishes are welcome on this bike.

I also reversed the front forks to put the brake on the left side.  If it weren't for the speedometer, we could have ran it reversed but alas, it is now changed.

Matt finish sanded the tank's clear coat while I wrenched on the front end.

The shiny bars were rough sanded and then painted with the flat black.  Not sure if we should have given them a coat of primer but it is too late now!


Surprise! Look what spilled out of the headlight bucket!?!  It really is Ol' Stinky.

All the grinding and metal particles in the garage have collected in an outline around the church key.


Rolling Chassis

Staying positive, we decided to start bolting items to the frame.  It has been more than a week so the paint should be cured enough to not crack with the slightest touch....right?? guys???  Maybe not.

Where the hell are all the bolts?  Note: Organize bolts better next time.   Finally got the swingarm and shocks on,  Forks installed as well.


When in doubt, lube!

First roller!

The Lovely Lauren


Side profile with old seat foam.


So...it looks great! Except the front wheel and tire is on backwards and the forks need to be reversed.  More.  Ctrl-Z.


Stubborn Bolt

On Monday I rode the upper crankcase over to Denis' shop and brought a Grade 8 nut to weld on to the remainder of our stuck bolt.

The nut here is red hot, weld inside.

Each time, the weld didn't take very well to the bolt sticking out of the case so after four attempts of turning it and breaking the weld, we changed course. A bigger bolt was in order.

Snapped that sucker off too but it sheared the remainder of the bolt off at the case edge.  


Okay time to get a new upper crank case.  The cost is about the same as drilling it out and putting in a threadsert.  New case on the way via ebay.  Just another roadblock to getting the engine in the bike.

Tuesday, April 24, 2012

If Chicken and Waffles Could Extract Bolts...

The wrenching Monday began with a delicious Chicken and Waffles meal.

The first casualty of the night was our friend Mr. Beetle.  He went for a swim in the cup of WD-40 RIP


Moving right along...I rebuilt the front forks and filled them with ATF fluid.  What a difference with the new seals and fresh oil!

Next Matt removed the transmission and crank to clean out the sludge at the bottom of the engine.


Matt noticed this on our top half of the case: SL250...hmmm

Say...that kick start gear is missing a tooth!

 The next item of discontent was this sheared engine bolt.  The bolt is steel and the case aluminum.  They've become quite attached over the past 35 years.
 After exhausting all options with the vice grips, Matt resorted to heat to try and get it out.  This is an oxygen bubble and the torch did not look like that all the time folks ;)

So some heat, a hammer, vice grips and...nothing - just a rounded bolt.  Bugger all.

Stymied in that direction, it was time to work on rebuilding the triple tree.  Despite bearings rolling all over the garage upon disassembly all 36 (18 1/4" bearings on each side) were accounted for.


TADA!!!  The first bit bolted onto the frame :)

We also rebuilt the rear shocks after having painted the springs.  This was in preparation for the swingarm installation.  A rolling chassis is on the horizon!!!


Friday, April 20, 2012

A weld too short is more like it...

It was a late night in the garage.  Got the final coat on the frame around 2am.

First, Gratuitous Welding shots:


 The "weld too short" was the kickstand mount that we decided not to just guess on.  To get the angle/placement right we need it to be a roller.  I guess we'll be leaning it on parking meters/trees for the time being...


Frame finally painted.  Now the problem of finding the patience to let it cure for a week before we start bolting things to it...


Tail looks great.  Many thanks to Denis!


Rolling chassis, here we come...

Thursday, April 19, 2012

A Weld Too Far

Leaving work an hour early was nice.

I rode the BMW down the HOV to Newington where my friend Denis works.  His shop had every tool and equipment item for fabrication I could think of.


First step was to cut off the old frame support.


The next step was to bend the existing hoop to give it a bit of an angle.  Unfortunately this resulted in closing the ends up and not really bending anything.


Next, we bent some smaller diameter bar to support the thin and hollow loop into the frame.  We mocked up the hoop then went and bent the bar to match the necessary angle.

A few tack welds to hold it in place

Then the MIG welding!

(insert video)


After letting it cool a bit, we thanked him profusely and headed back to the garage to get some work done!  I took a stop at Lowes to pick up 50lb of play sand.  When I pulled in, I couldn't resist parking in front of this bumblebee airhead GS


So 50lb extra on one side of a motorcycle is VERY STRANGE

Once unloaded at the garage, he made burgers and I set up the equipment for sandblasting in the yard.

A man can't live on beer alone...for long...so - Burgers :)

I then blasted the engine mounts, kickstand and fenders.


Meanwhile, Matt ground off the existing tabs and smoothed out some of the welds and loose metal pieces.


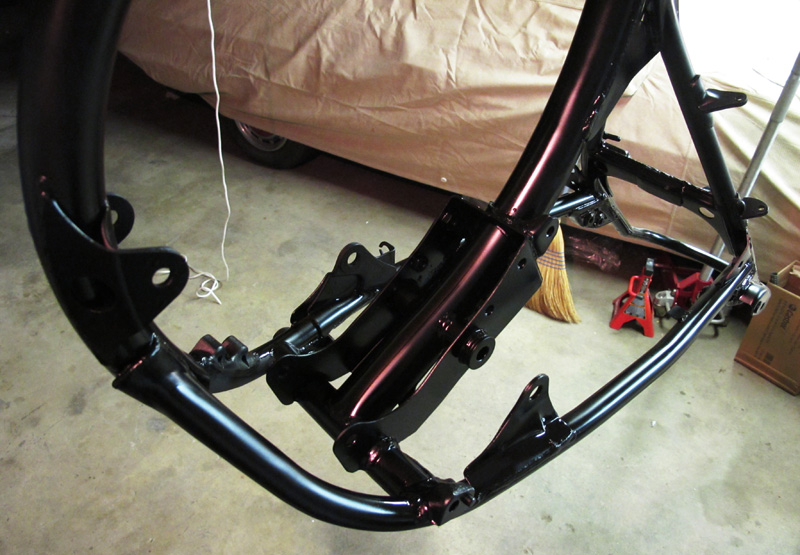
The frame was sanded again and acetone cleaned.

A little bondo filled in the cracks and small imperfections in the weld area.  He did such a great job welding the issues were mostly our own doing!

We also picked up a piece of foam to later mock up a seat design.  VERY stoked about that.


I was tired and ready to head home.  Matt was drinking and on a ladder preparing the ceiling for wires to hang parts for painting.  With 2-3 hours of drying time required before the bondo sets, it could be a late night getting primer and paint done.   Go Matt Go!!